
Looking for baby Halloween crafts that are cute, quick, and actually manageable with tiny hands (and tiny attention spans)?
This super-friendly guide is packed with Halloween handprint art, Halloween footprint crafts, “Baby’s First Halloween” keepsakes, baby Halloween card ideas, and easy toddler Halloween art, all using washable, non-toxic supplies.
Think: nap-time setups, five-minute wins, and keepsakes you’ll love forever.
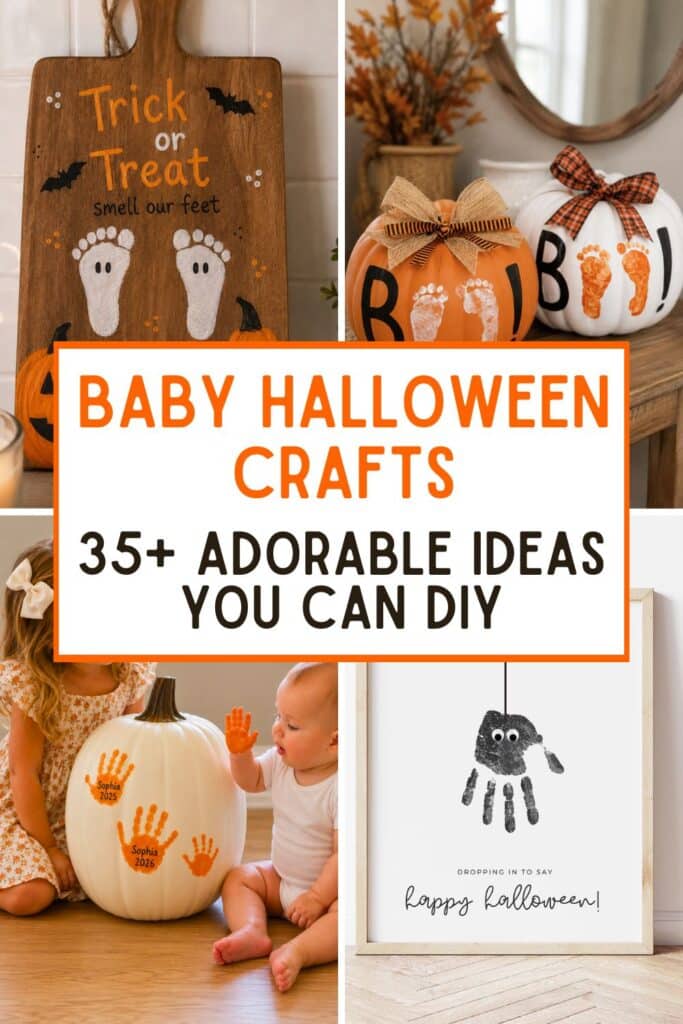
How to Use This Post
Skim the sections that fit your baby’s age, pick one easy win, and set it up in five minutes or less.
Each idea includes Age, Supplies, Steps (plus a Bonus Tip) so you’re not doing mental gymnastics with a baby on your hip.
Add your photos as you go. Little hands in the frame make the cutest memories.
Handprint & Footprint Keepsakes (Heart-melt guaranteed)
These quick prints turn tiny hands and feet into frame-worthy Halloween art you’ll treasure for years.
1) Growing Handprint Pumpkin (A Year-After-Year Family Tradition)
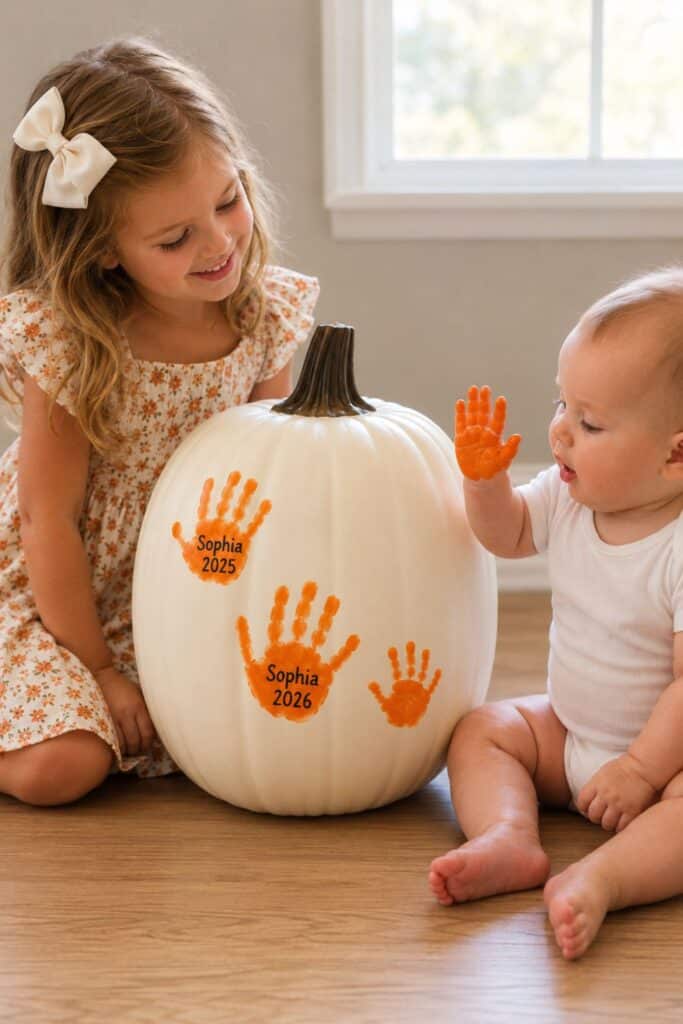
Age: 0 to 24 months and up
Supplies: Large white craft pumpkin, orange acrylic paint, fine black paint pen, clear sealer
Steps: Paint each child’s palm orange and press it firmly onto the side of the pumpkin, then let it dry and write their name and the year inside the print with a black paint pen.
Seal it and store the pumpkin with your Halloween decorations.
Every October, add a new print. New siblings just find an empty spot. 🎃
Infant tweak: Have a second grown-up hold baby’s wrist and press the fingers down one at a time, then lift straight up rather than sliding.
Bonus Tip: Use a craft pumpkin rather than a real one so it lasts for years. If you only make one thing on this list, make this.
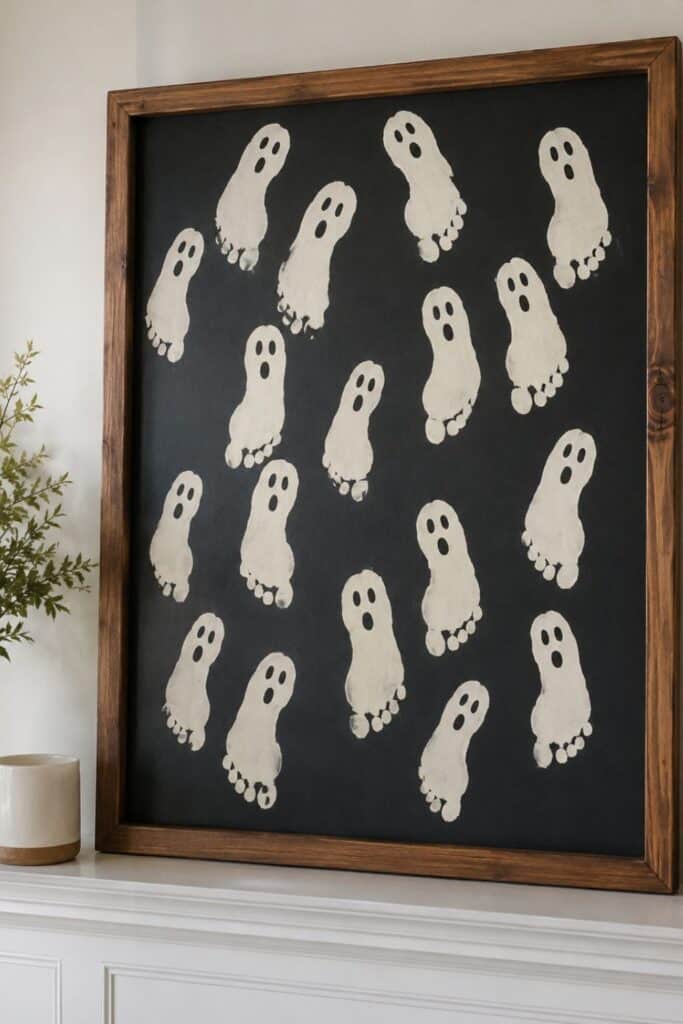
2) Footprint Ghost Gallery Board
Age: 0 to 24 months
Supplies: Large black canvas or chalkboard panel, cream or off-white acrylic paint, fine black paint pen, wood frame
Steps: Paint the bottom of baby’s foot cream and press it onto the black background with the heel at the top, then repeat at different angles until the board is full.
Add two dot eyes and a small open mouth to each heel once dry.
Cream paint on black reads as ghosts instantly, and the toes become the wavy little tail. 👻
Infant tweak: Do three or four prints per sitting rather than filling the whole board at once. Nobody is happy at print number twelve.
Bonus Tip: Mix in prints from every kid in the house. In a few years you will be able to point out exactly whose foot was whose.
3) Hanging Handprint Spider
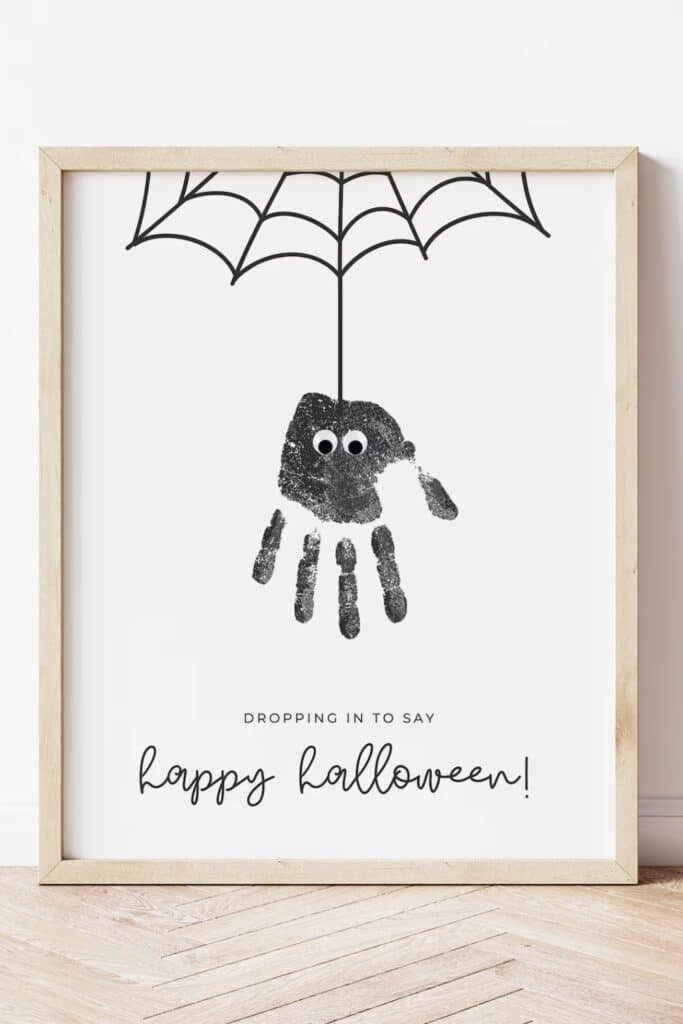
[AFFILIATE LINK: Etsy printable handprint spider template]
Age: 6 to 24 months
Supplies: White cardstock or a printable template, black paint, fine black marker, googly eyes
Steps: Draw a spiderweb across the top corner of the page with a single line dropping down from the center, then stamp one black handprint at the bottom of that line with the fingers pointing down as legs.
Add two googly eyes to the palm once dry.
Only one print needed, which makes this one of the easiest keepsakes here.
Infant tweak: Draw the eyes with a white paint pen instead of gluing on googly eyes.
Bonus Tip: Add “dropping in to say happy Halloween” underneath and it becomes a card you can mail to grandparents.
4) Bat Footprint Art
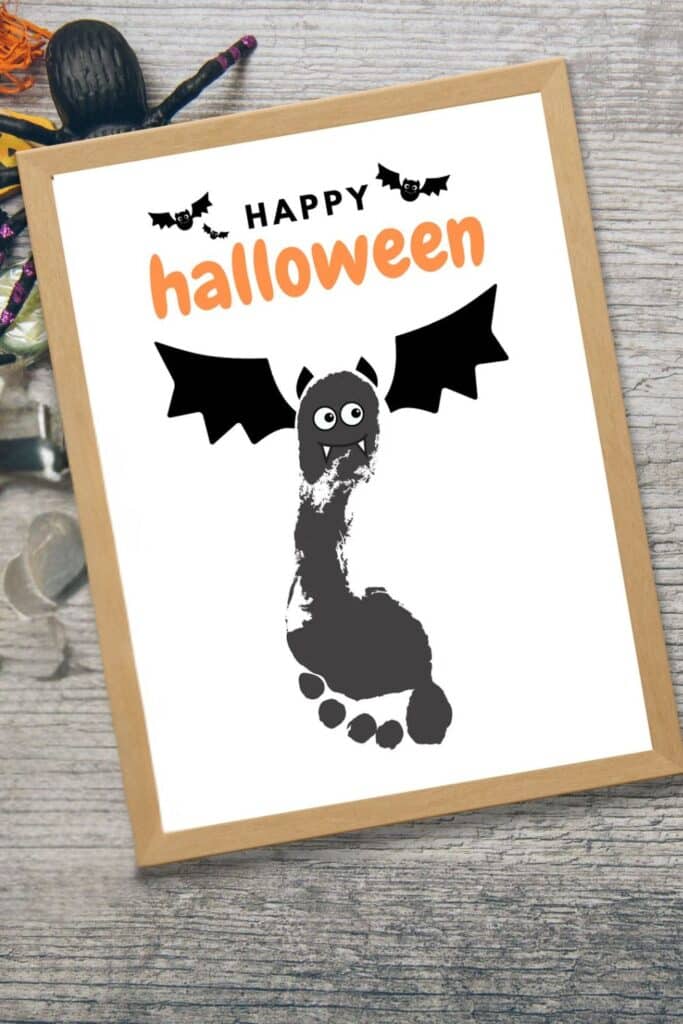
Age: 0 to 18 months
Supplies: Printable bat template or white cardstock, black or dark grey paint, googly eyes and black cardstock if making your own
Steps: Paint the bottom of baby’s foot black and stamp it onto the template with the toes pointing down and the heel at the top, so the heel becomes the bat’s head.
Add wings, ears, and a face at the heel end once dry.
The toes read as the bat’s little feet, which is the part that gets people. 🦇
Infant tweak: One clean print beats three smudged ones. Press the toes down individually, then lift straight up.
Bonus Tip: A printable template with the wings and face already on it turns this into a five-minute craft, which matters when you are working around a nap.
5) Candy Corn Footprint
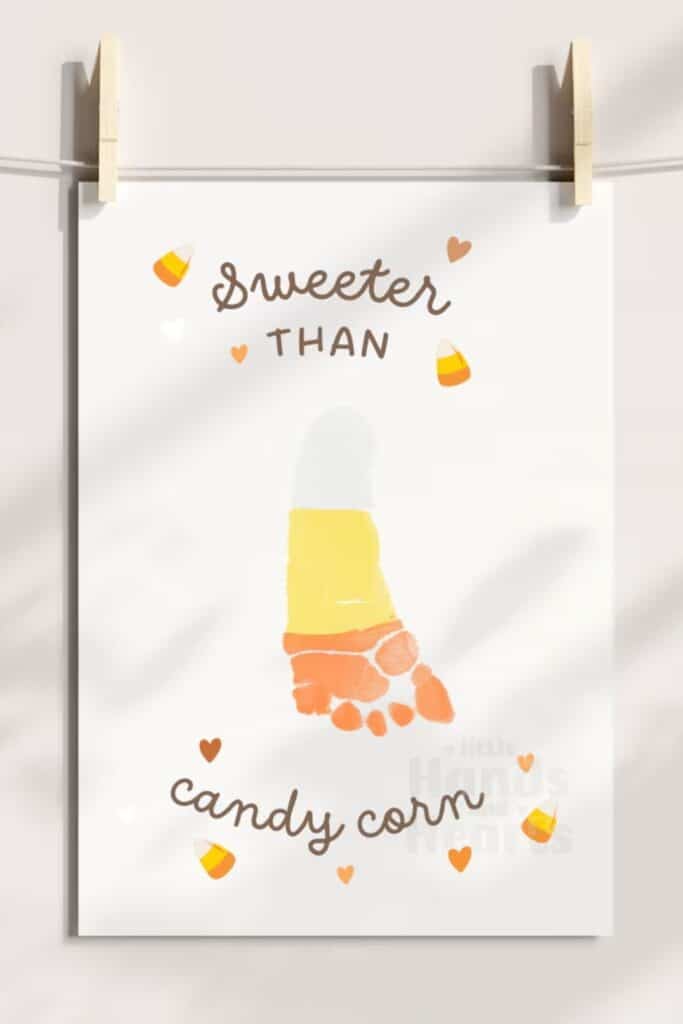
Candy Corn Footprint Art Digital Downlad
Age: 0 to 18 months
Supplies: White, orange, and yellow paint, cardstock
Steps: Paint the toes white, the middle of the foot orange, and the heel yellow, then stamp once with the toes pointing up.
Bonus Tip: Practice the color bands on scrap paper first so the stripes land where you want them.
6) Thumbprint Pumpkin Patch
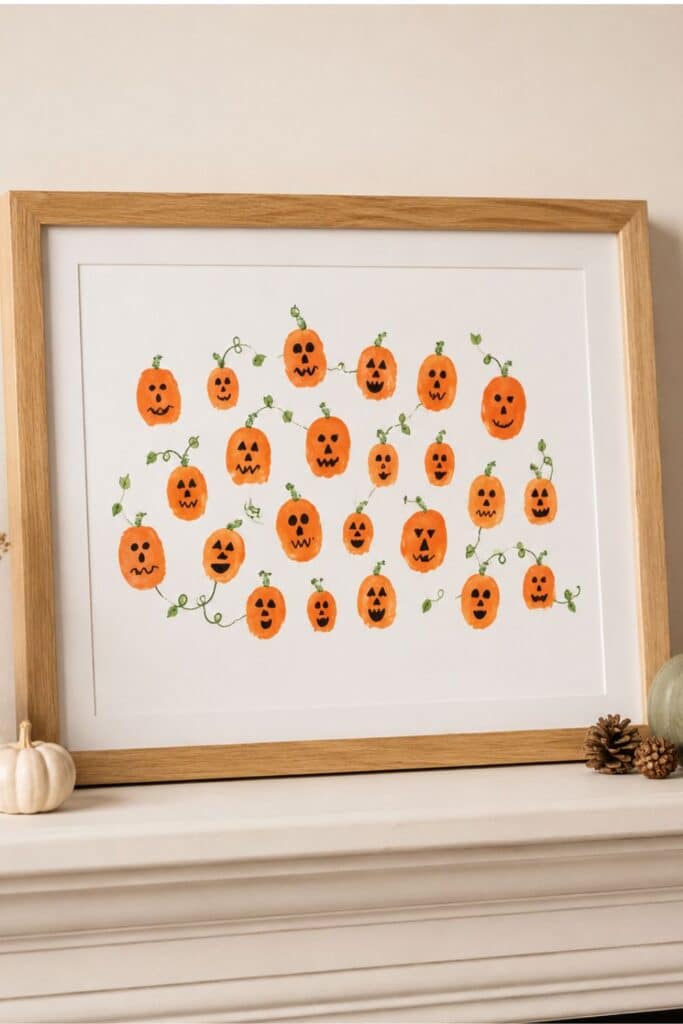
Age: 9 to 24 months
Supplies: Non-toxic ink pad or orange paint, cardstock, fine green marker
Steps: Press thumbprints in rows across the page, then add tiny stems and vines once dry.
Bonus Tip: A row of five with “my first pumpkin patch” underneath makes a sweet framed piece.
7) Handprint Monster
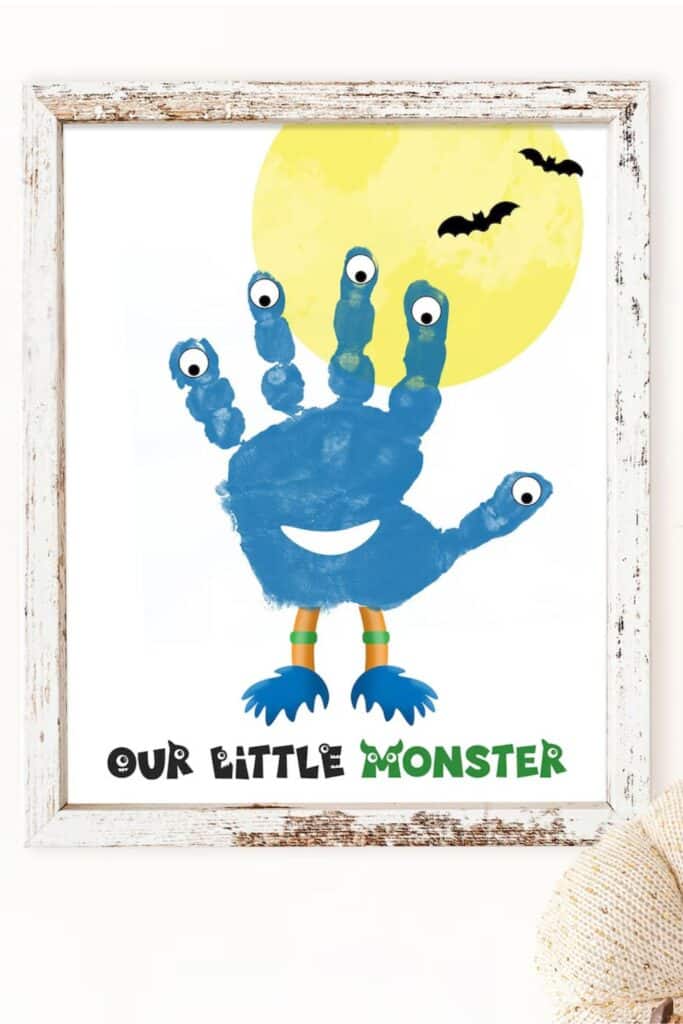
Age: 6 to 24 months
Supplies: Green, purple, or teal paint, cardstock, marker
Steps: Stamp one handprint with fingers pointing up, then add eyes and a silly smile on the palm.
Bonus Tip: Let baby pick the color by offering two paint dishes and seeing which one they reach for.
8) “Baby’s First Halloween” Footprint Sign
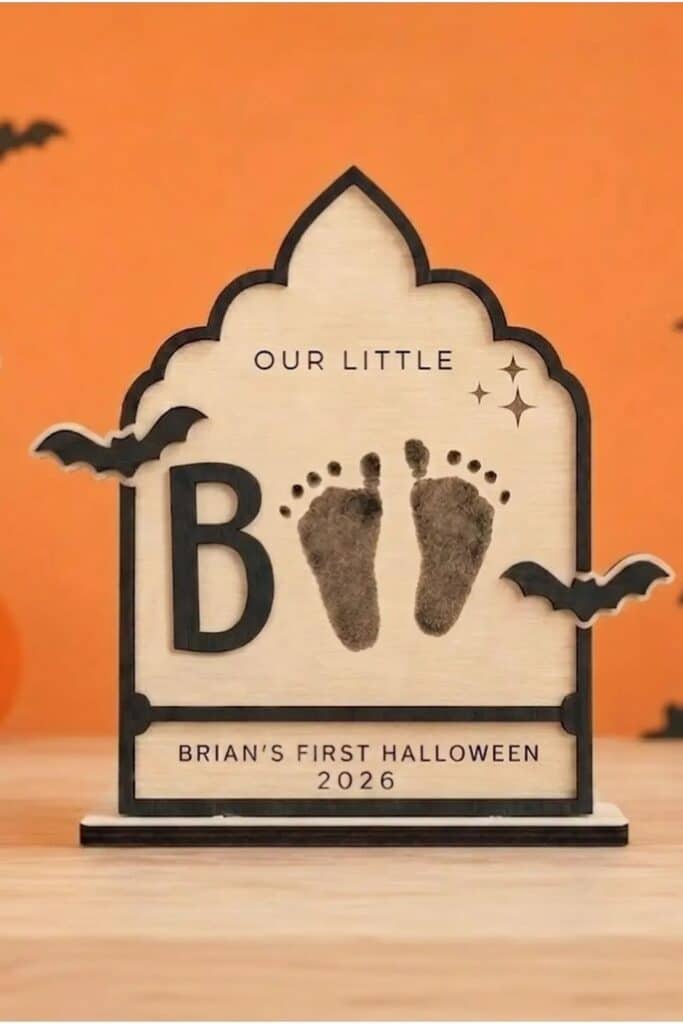
Baby’s First Halloween Keepsake
Age: 0 to 24 months
Supplies: Cardstock or small wood plaque, paint, paint pen
Steps: Stamp one clear footprint in the center, then write “Baby’s First Halloween” above it and the year below.
Bonus Tip: This one photographs beautifully next to a pumpkin on the porch.
See also: 45+ Baby’s First Halloween Ideas
DIY “Baby’s First Halloween” Keepsakes (Giftable & frame-worthy)
Cute enough to gift, sturdy enough to keep for years.
9) Wood Pumpkin Handprint Keepsake
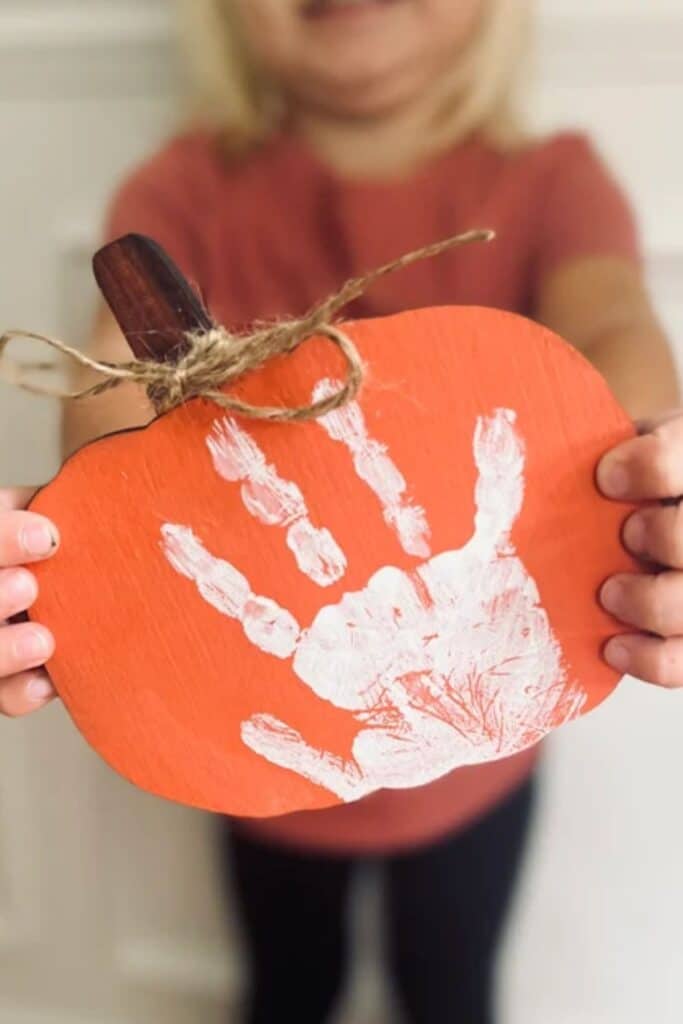
DIY Handprint Pumpkin Craft Kit
Age: 0 to 24 months
Supplies: Unfinished wood pumpkin cutout, orange acrylic paint, white acrylic paint, twine, clear sealer
Steps: Paint the whole pumpkin orange and let it dry completely, then paint baby’s palm white and press it firmly in the center.
Tie a small twine bow around the stem once everything is dry.
Infant tweak: Have a second grown-up hold baby’s wrist steady and press each finger down one at a time. Lift straight up rather than dragging.
Bonus Tip: Write the year in small letters on the back, then make a second one for grandma while your paint is already out.
10) Salt Dough Pumpkin Handprint Keepsake
Age: 0 to 12 months
Supplies: 1 cup salt, 2 cups flour, about ¾ cup water, straw, ribbon, orange and green paint
Steps: Mix and roll the dough, press baby’s hand in firmly, cut a circle around it, poke a hanging hole, then bake at 200°F for 2 to 3 hours and paint once fully cool.
Bonus Tip: Write name and year on the back with a paint pen before you seal it.
11) “BOO!” Footprint Pumpkin
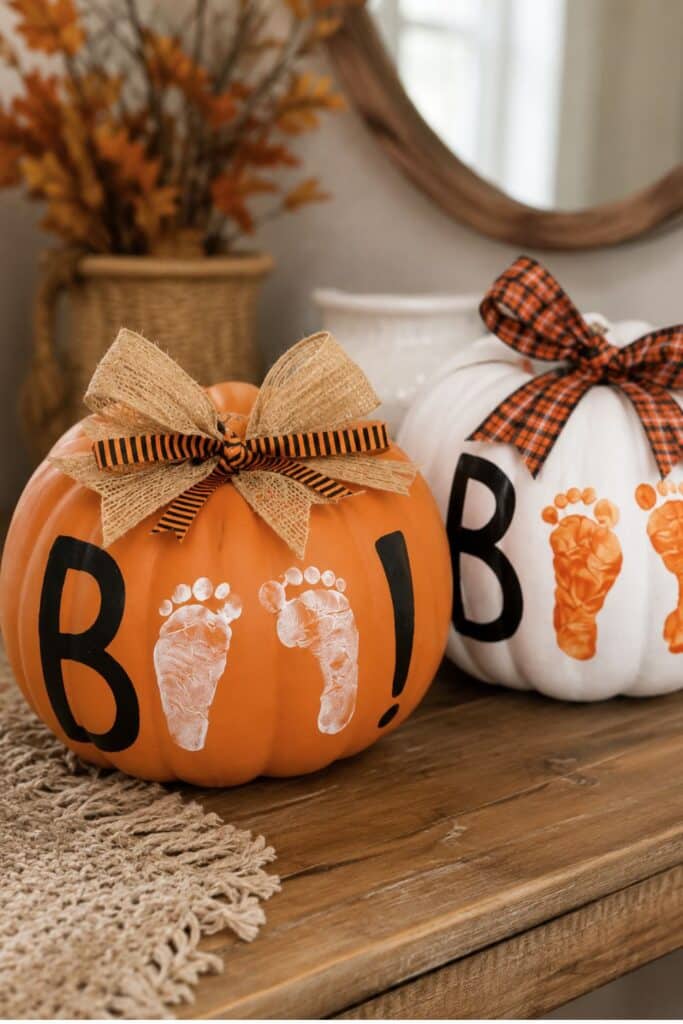
Age: 0 to 18 months
Supplies: Craft pumpkin in white or orange, acrylic paint in a contrasting color, black paint pen, ribbon, sealer.
Steps: Paint a large black B on one side of the pumpkin and an exclamation point a few inches over, leaving space between them for two footprints.
Stamp both feet in the gap so the prints become the two O’s, then tie a ribbon bow at the stem once everything is dry.
Infant tweak: Sketch the B and the exclamation point in pencil first so you know exactly how much room the feet need. Newborn prints are smaller than you think.
Bonus Tip: Both color combinations work. White prints on an orange pumpkin, or orange prints on a white one. Make one of each and you have a matched pair for the entryway.
12) Air-Dry Clay Ghost Handprint Plaque
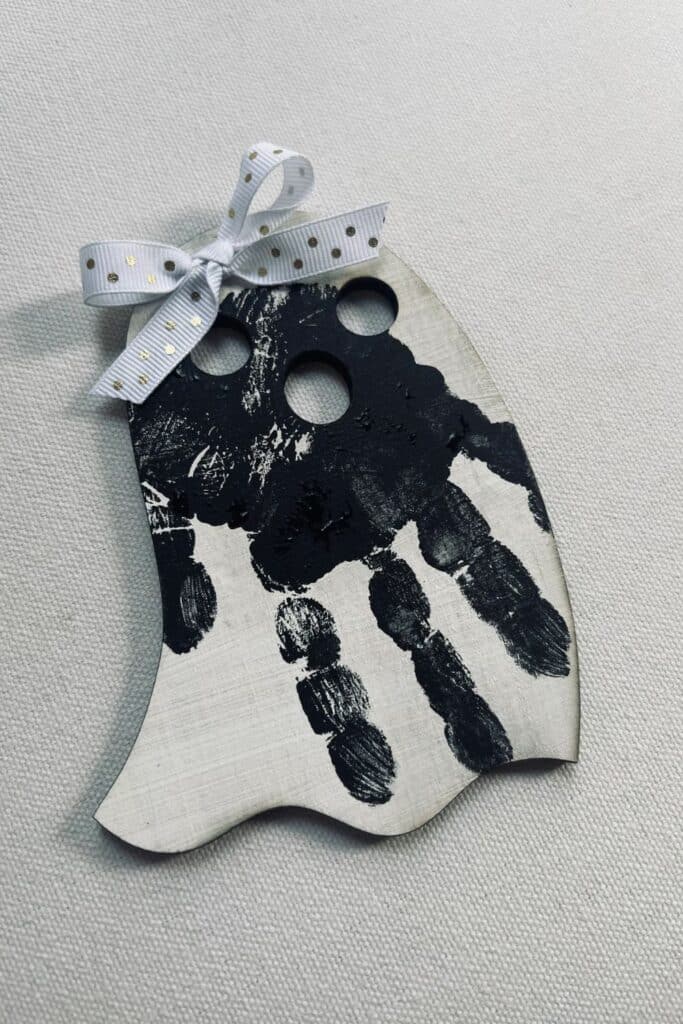
Age: 0 to 24 months
Supplies: Air-dry clay, ribbon, fine black marker
Steps: Flatten the clay, press baby’s hand in, trim the edges into a soft ghost shape with the fingers as the wavy bottom, then let dry and add two dot eyes.
Bonus Tip: Leave it unpainted. The natural clay looks modern and it will not yellow.
13) “Baby’s First Halloween” Mini Canvas
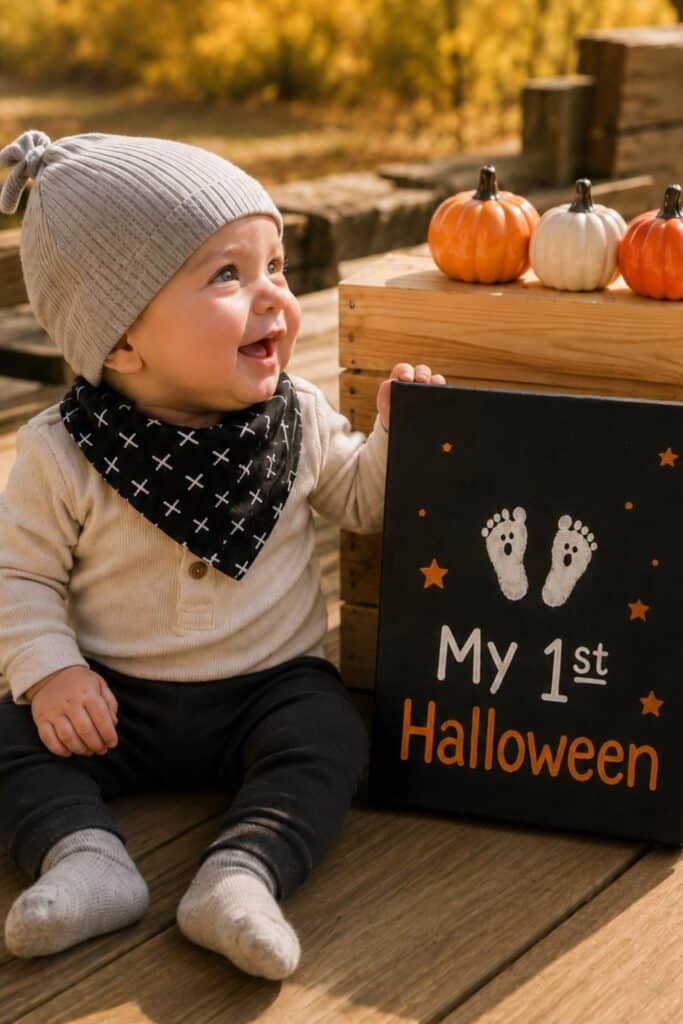
Age: 0 to 12 months
Supplies: Small black canvas, white acrylic paint, orange paint pen, white paint pen
Steps: Stamp both feet in white near the top of the canvas with the toes pointing up, then add two dot eyes and a small open mouth to each heel so the prints become little ghosts.
Write “My 1st Halloween” underneath and scatter a few small orange stars around the edges.
Infant tweak: Do one foot, let it dry, then do the other. Trying to stamp both at once with a wiggly baby rarely ends well.
Bonus Tip: Prop it beside baby for your Halloween photos, then hang it up. It is a keepsake and a photo prop in one, which is the best kind of craft when you are short on time.
14) Footprint Ghost Garland
Age: 9 to 24 months
Supplies: White cardstock, paint, string, black marker
Steps: Stamp several footprint ghosts, cut them out, add faces, then string them across a doorway or mantel.
Bonus Tip: Use it as a photo backdrop after Halloween is over, then tuck it into the memory box.
15) “Trick or Treat, Smell Our Feet” Sign
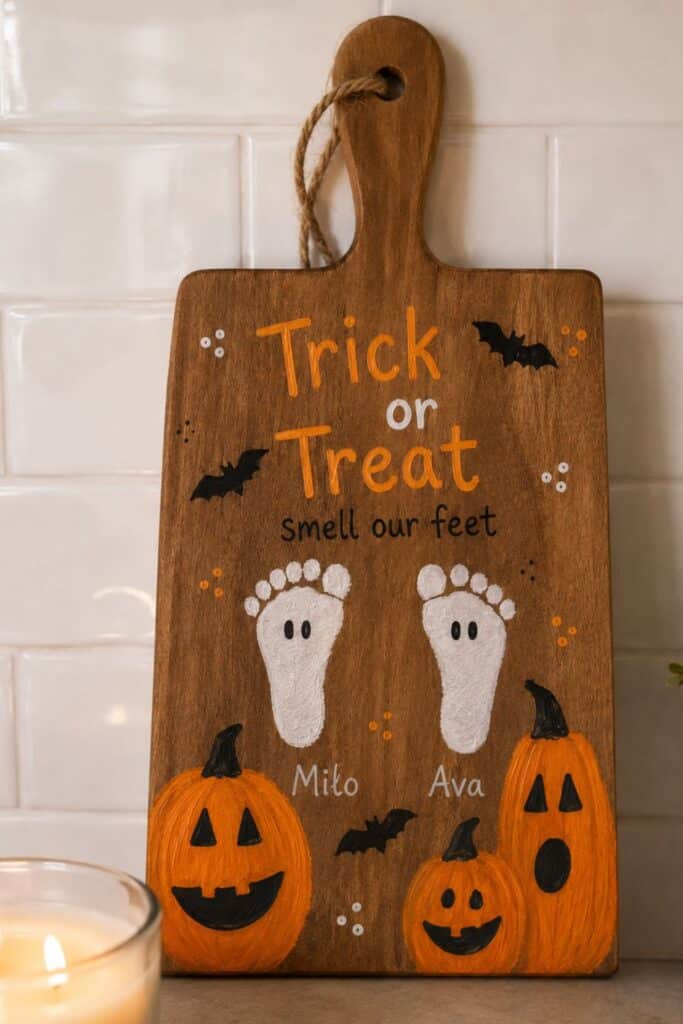
Age: 0 to 24 months and up
Supplies: Wood paddle board or plaque, white acrylic paint, orange and black paint pens, twine, sealer
Steps: Stamp each child’s foot in white side by side in the center of the board with the toes pointing up, then add two dot eyes to each so the prints become ghosts.
Write the rhyme above them, add each name underneath, then paint small pumpkins and bats around the edges.
Infant tweak: Do the toddler’s print first while they are excited to help, then the baby’s once they are settled. Chasing both in one sitting is a lot.
Bonus Tip: Add a new print each year as your family grows, or make a fresh board each Halloween and line them up as a set.
Sensory-Friendly Halloween Art for Babies
Low-mess, high-delight projects that focus on textures and safe exploration.
16) Taste-Safe Orange Paint (Yogurt Paint)
Age: 6 to 12 months
WANT TO SAVE THIS FOR LATER?
Supplies: Plain yogurt, a drop each of red and yellow food coloring, tray, cardstock
Steps: Tint the yogurt orange, swirl it on the tray, let baby smear, then press paper on top to lift the print.
Bonus Tip: Tape the paper down so it does not slide.
17) Spooky Sensory Bag (Zero-Mess)
Age: 6 to 18 months
Supplies: Zip bag, clear hair gel, large plastic spiders or big sequins, painter’s tape
Steps: Fill the bag, seal it, tape all four edges to the high-chair tray, and let baby squish.
Infant tweak: Use hair gel rather than shaving cream, double-bag it, and tape every edge down.
Bonus Tip: Outline a pumpkin shape on the outside with tape for tracing.
18) Halloween Discovery Bottle
Age: 6 to 18 months
Supplies: Clear plastic bottle, orange and black pom poms, ribbon scraps
Steps: Fill the bottle, hot-glue the lid closed (grown-up step), then shake and roll.
Bonus Tip: Keep every piece bigger than the bottle opening.
19) Pumpkin Sponge Stamping
Age: 9 to 24 months
Supplies: Sponge, orange paint, cardstock, green marker
Steps: Cut the sponge into a rough pumpkin shape, dip, and stamp across the page, then add stems once dry.
Bonus Tip: One color plus one accent color always looks the most frameable.
20) Pumpkin Guts Sensory Bin
Age: 12 to 24 months
Supplies: One small pumpkin, scoops, a shallow bin
Steps: Cut the top off, scoop the insides into the bin, and let your toddler squish, scoop, and pour.
Bonus Tip: Do it outside or on a towel, and save a few clean seeds to paint later.
21) Sticky Spider Web Collage
Age: 9 to 24 months
Supplies: Contact paper, black yarn scraps, cotton balls
Steps: Tape contact paper sticky side up, let baby press yarn and cotton into a web, then seal with a second sheet.
Bonus Tip: Perfect for babies who want to grab everything except the paintbrush.
Paper, Stickers & No-Paint Wins (High-chair approved)
Fast crafts you can finish before the snack is gone, no paint required.
22) Dot-Sticker Pumpkin
Age: 9 to 24 months
Supplies: Cardstock, orange dot stickers, green marker
Steps: Draw a large pumpkin outline and let baby fill it in with dot stickers.
Bonus Tip: Peeling stickers is genuinely great fine-motor practice.
23) Paper Plate Spider Web
Age: 12 to 24 months
Supplies: Paper plate with the center cut out, white yarn, hole punch
Steps: Punch holes around the rim, then let your toddler thread yarn back and forth across the opening.
Bonus Tip: Tape the yarn end to make a stiff “needle” that is easier for small hands.
24) Washi Tape Mummy
Age: 12 to 24 months
Supplies: White washi tape, cardstock, googly eyes or marker
Steps: Draw a simple body outline and let your toddler crisscross tape strips over it until it looks wrapped.
Bonus Tip: Tape is forgiving and surprisingly calming.
25) Ghost Sticker Sheet Art
[AFFILIATE LINK: Amazon Halloween sticker sheets]
Age: 9 to 24 months
Supplies: Ghost outlines printed on cardstock, stickers or bingo daubers
Steps: Fill the shapes with dots and stickers.
Bonus Tip: Print on cardstock and save them in a binder as a year-by-year record.
26) Contact Paper Pumpkin Collage
Age: 9 to 24 months
Supplies: Contact paper, orange tissue squares, paper pumpkin frame
Steps: Tape the contact paper down sticky side up, let baby press tissue on, then seal with another sheet.
Bonus Tip: Hang it in a window so the light comes through.
27) Tissue Paper Candy Corn
Age: 12 to 24 months
Supplies: Candy corn outline, white, orange, and yellow tissue squares, glue stick
Steps: Crumple and glue tissue into the three color bands.
Bonus Tip: Pre-tear the tissue into piles by color so it stays sorted.
Nature & Recycled (Walk-then-craft)
Turn a short stroller walk into a free supply run, then craft with what you collected.
28) Cardboard Tube Pumpkin Stamps
Age: 12 to 24 months
Supplies: Toilet paper roll, orange paint, cardstock
Steps: Pinch the tube into a rough pumpkin shape, tape it so it holds, then dip and stamp.
Bonus Tip: Make a whole pumpkin patch across a long strip of kraft paper.
29) Leaf Rubbing Ghosts
Age: 18 to 24 months
Supplies: Collected leaves, white paper, black crayon
Steps: Place a leaf under the paper, rub the crayon over it, then add two eyes so the shape becomes a little ghost.
Bonus Tip: Collect the leaves on your walk and let it be two activities in one.
30) Egg Carton Spiders
Age: 18 to 24 months
Supplies: Egg carton cups, black paint, pipe cleaners, googly eyes
Steps: Cut the cups apart (grown-up step), let your toddler paint them, then poke pipe cleaner legs through the sides.
Bonus Tip: Bend the leg tips so nothing sharp is sticking out.
31) Pinecone Ghosts
Age: 12 to 24 months
Supplies: Pinecones, white paint, black marker
Steps: Pre-paint the pinecones white, let dry, then add two dot eyes.
Bonus Tip: Line a few along a windowsill for instant seasonal decor.
Snack-Crafts (Edible-ish activities)
Tasty little projects that double as a festive snack and a photo op.
32) Banana Ghosts
Age: 9 to 24 months (food introduced)
Supplies: Banana halves, a few blueberries or raisins
Steps: Stand a banana half upright and press in berry eyes and a mouth.
Bonus Tip: Snap the photo fast. These do not last long in either sense.
33) Clementine Pumpkins
Age: 9 to 24 months
Supplies: Peeled clementines, thin celery or cucumber sticks
Steps: Set a small stick in the top of each clementine as the stem.
Bonus Tip: The easiest healthy snack on this entire list.
34) Apple “Stamp” Painting
Age: 18 to 24 months
Supplies: Apple halves, yogurt or washable paint, paper
Steps: Dip the cut side of the apple and stamp it to make round pumpkin shapes, then add stems.
Bonus Tip: Use a tray. This gets joyful fast.
35) Halloween Trail Mix for Toddlers
Age: 18 to 24 months
Supplies: Puffs, yogurt melts, dried fruit, pumpkin-shaped cereal if you can find it
Steps: Mix in a bowl, scoop into cups, and snack.
Bonus Tip: Skip nuts and anything hard for little ones. See my full guide to Halloween treat ideas for babies for more.
Photo-Op Props (Craft it, then snap it)
Make a prop in minutes, snap your Halloween pic, and move on with your day.
36) “Baby’s First Halloween” Chalkboard Sign
Age: Any (grown-up writes)
Supplies: Small chalkboard or cardstock, chalk marker, ribbon
Steps: Write “My First Halloween” plus baby’s name, age, and the date, then prop it beside them for the photo.
Bonus Tip: Pair it with a pumpkin the same size as baby for scale.
37) No-Sew Felt Bat Wings
Age: 9 to 24 months
Supplies: Black felt, elastic, hot glue (grown-up)
Steps: Cut two scalloped wing shapes, glue them to a felt strip, then slip the elastic over baby’s arms for 60 seconds while you take the picture.
Bonus Tip: Pair with a plain black onesie. If you want the full costume rundown, see my baby Halloween costume ideas.
38) Ghost Garland Backdrop
Age: Any (grown-up assembly)
Supplies: White cardstock or fabric scraps, string, black marker
Steps: Cut simple ghost shapes, add faces, string them up, and hang the garland on a blank wall.
Bonus Tip: Shoot near a window. Natural light does most of the work.
10-Minute “I Can Do This Today” Ideas
Zero-prep crowd-pleasers for when you have exactly ten minutes of energy left.
39) One single perfect footprint ghost (frame it, call it done)
40) Pumpkin sticker on a onesie (stickers plus a quick photo equals a memory made)
41) Thumbprint spider card (one thumbprint, eight marker legs)
42) Window ghost (contact paper plus white tissue, stuck to the glass)
43) Sponge pumpkin gift wrap (stamp kraft paper for a boo basket)
If you are putting together a boo basket, that last one wraps it beautifully.
Set-Up & Clean-Up Hacks
A few smart habits keep the fun big and the mess small.
Contain the mess: Use a shallow under-bed bin as your craft tray.
Dress for success: A plain white onesie means cute photos and an easy bleach rescue.
Watch the orange: Orange and black paint stain more than most colors, so lay down more coverage than you think you need.
Drying zone: Cooling racks over parchment keep projects off the table.
Memory hack: Write name, age, and date on everything. The back corner is fine.
FAQs (Quick answers you actually need)
What paints are safest for babies?
Use washable, non-toxic, AP-certified paints. For under-1, stick to taste-safe options like tinted yogurt, and skip small parts and essential oils entirely.
Can my baby really “help” with crafts?
Yes. Helping means stamping, sticking, smearing, and exploring textures while you handle the cutting, the hot glue, and anything tiny.
What are the easiest Halloween crafts for infants?
No-mess wins first: sensory bags, contact-paper collages, and big-sticker activities. Add hand and footprint keepsakes when you have an extra set of hands to help hold baby steady.
How do I make baby Halloween cards fast?
Pick one: a footprint ghost, a handprint pumpkin, or a photo with a paper pumpkin frame. Add a short message and you are done.
What is the best Halloween craft for a newborn?
A footprint keepsake, hands down. Newborns cannot participate in much, but a footprint ghost or a salt dough print captures exactly how tiny they were this year, and that is the whole point.
Want a calm, organized season ahead?
Keep the fun rolling and your stress low with a simple checklist that handles the planning for you.
If you are also planning a first birthday soon, grab my first birthday planning checklist so all the cute ideas and timelines live in one tidy spot while you soak up this stage.
READ NEXT: